System Roles support for image mode (bootc) builds
Goal
Image mode, aka. “bootable containers”, aka. “bootc” is an exciting new way to build and deploy operating systems. A bootable container image can be used to install or upgrade a real or virtual machine, similar to container images for applications. This is currently supported for Red Hat Enterprise Linux 9/10 and Fedora/CentOS, but also in other projects like universal-blue.
With system roles being the supported high-level API to set up Fedora/RHEL/CentOS systems, we want to make them compatible with image mode builds. In particular, we need to make them detect the “non-booted” environment and adjust their behaviour to not e.g. try to start systemd units or talk to network services, and defer all of that to the first boot. We also need to add full bootc end-to-end integration tests to ensure this keeps working in the future on all supported platforms.
Build process
This can work in two ways. Both ought to work, and which one you choose depends on your available infrastructure and preferences.
Treat a container build as an Ansible host
Start a container build with e.g.
buildah from --name buildc quay.io/centos-bootc/centos-bootc:stream10
Create an inventory for the buildah connector:
buildc ansible_host=buildc ansible_connection=buildah ansible_become=false ansible_remote_tmp=/tmp
Then run the system-roles playbooks on the “outside” against that inventory.
That matches the spirit of Ansible and is cleaner as Ansible itself and system-roles do not need to be installed into the container. This is the approach outlined in “Building Container Images with Buildah and Ansible” and Ansible and Podman Can Play Together Now and implemented in the ansible-bender proof of concept (⚠️ Warning: currently unmaintained).
Install Ansible and the system roles into the container
The Containerfile looks roughly like this:
FROM quay.io/centos-bootc/centos-bootc:stream10
RUN dnf -y install ansible-core rhel-system-roles
COPY ./setup.yml .
RUN ansible-playbook setup.yml
Everything happens inside of the image build, and the playbooks run against
localhost. This could use a multi-stage
build to avoid having
Ansible and the roles in the final image. This is entirely self-contained and
thus works well in automatic container build pipelines.
⚠️ Warning: Unfortunately this is currently broken for many/most roles because
of an Ansible bug: service: fails in a container build environment.
Once that is fixed, this approach will work well and might often be the
preferred choice.
Status
This effort is tracked in the RHEL-78157 epic. At the time of writing, 15 roles are already supported, the other 22 still need to be updated.
Roles which support image mode builds have the containerbuild tag, which you
can see in the Ansible Galaxy view (expand the tag list at the top), or in the source code in meta/main.yml.
Note that some roles also have a container tag, which means that they are
tested and supported in a running system container (i.e. a docker/podman
container with the /sbin/init entry point, or LXC/nspawn etc.), but not
during a non-booted container build.
Steps for converting a role
Helping out with that effort is very much appreciated! If you are interested in making a particular role compatible with image mode builds, please follow these steps:
-
Clone the role’s upstream git repository. Make sure that its
meta/main.ymlfile does not yet have acontainerbuildtag – if it does, the role was already converted. In that case, please update the status in the epic. -
Familiarize yourself with the purpose of the role, have a look at README.md, and think about whether running the role in a container generally makes sense. That should be the case for most of them, but e.g
storageis hardware specific and for the most part does not make sense in a container build environment. - Make sure your developer machine can run tests in in general. Do the
integration test setup and also read the following sections about running QEMU and container tests.
E.g. running a QEMU test should work:
tox -e qemu-ansible-core-2-20 -- --image-name centos-9 --log-level=debug -- tests/tests_default.yml - Do an initial run of the default or other test during a bootc container build, to get a first impression:
LSR_CONTAINER_PROFILE=false LSR_CONTAINER_PRETTY=false tox -e container-ansible-core-2-20 -- --image-name centos-9-bootc tests/tests_default.yml -
The most common causes of failures are
service_facts:which just simply doesn’t work in a container, and trying to set thestate:of a unit inservice:. The existing PRs linked from RHEL-78157 have plenty of examples what to do with these.The logging role PR is a good example for the standard approach of adding a
__rolename_is_bootedflag to the role variables, and use that to conditionalize operations and tests which can’t work in a container. E.g. the aboveservice: status:can be fixed withstate: "started"service_facts:can be replaced withsystemctl is-enabledor similar, see e.g. the corresponding mssql fix or firewall fix.Do these “standard recipe” fixes to clear away the easy noise.
-
Create a branch on your fork, and add a temporary commit to run tests on branch pushes, and another commit to enable tests on container builds and in system containers. With that you can iterate on your branch and get testing feedback without creating a lot of PR noise for other developers on the project. Push to your fork, go to the Actions page, and wait for the first test result.
-
As described above, the
containertag means that the role is supported and works in (booted) system containers. In most cases this is fairly easy to fix, and nice to have, as running tests and iterating is faster, and debugging is also a bit easier. In some cases running in system containers is hard (like in the selinux or podman roles), in that case don’t bother and remove that tag again. -
Go through the other failures. You can download the log archive and/or run the individual tests locally. The following command helps for easier debugging – it keeps the container running for inspection after a failure, and removes containers and temp files from the previous run:
buildah rm --all; rm -rf /tmp/runcontainer.*; LSR_DEBUG=1 LSR_CONTAINER_PROFILE=false LSR_CONTAINER_PRETTY=false tox -e container-ansible-core-2-20 -- --image-name centos-9-bootc tests/tests_default.ymlYou can enter the container and debug with
buildah run tests_default bash. The container name corresponds to the test name; checkbuildah ps. -
Fix the role and tests until you get a green result. Finally clean up and sort your commits into fix: Skip runtime operations in non-systemd environments, and feat: Support this role in container builds. Any role specific or more intrusive and self-contained change should be in separate commits before these.
-
Add an end-to-end integration test which ensures that running the role during a container build actually works as intended in a QEMU deployment. If there is an existing integration test which has representative complexity and calls the role just once (i.e. tests one scenario), you can convert it like sudo’s bootc e2e test. If there is no existing test, you can also add a specific bootc e2e test like in this demo PR or the postgresql role.
-
To locally run the bootc e2e test, see Image mode testing tox-lsr docs.
-
Push the e2e test to your branch, iterate until green.
-
Send a PR, link it from the Jira epic, get it landed, update the list in the Jira epic again.
- Celebrate 🎉 and brag about your contribution!
DevConf2021.cz - Presentation and Demo
There was a presentation entitled “Managing Standard Operating Envs with Ansible” given at DevConf2021.cz. Demo files and links to videos can be found at DevConf2021.cz
CI changes - Github Actions and tox-lsr
We have recently moved our github CI to use Github Actions instead of Travis. Our organization template is here: https://github.com/linux-system-roles/.github
We currently aren’t using any of the more advanced features of Github Actions, as we wanted to achieve parity with Travis as soon as possible.
We have also replaced all of the local scripts used for CI testing with tox-lsr. If you are a system roles developer, you will need to modify your workflow in order to use the new plugin. See README.md for more information.
Introduction to Network Role
Introduction
The network role supports two providers: NetworkManager(nm) and initscripts. For CentOS/RHEL 6, we only use initscripts as providers. For CentOS/RHEL 7+, we use initscripts and nm as providers. Various networking profiles can be configured via customized Ansible module. Several tasks will run for host networking setup, including but not limited to, package installation, starting/enabling services. Network role CI system consists of Tox running unit tests and Test-harness running integration tests. When we use Tox to run unit tests, we can check code formatting using Python Black, check YAML files formatting etc. Integration tests run in internal OpenShift, watch configured GitHub repositories for PRs, check out new PR, run all testing playbooks against all configured images, fresh machine for every test playbook, sets statuses of PR and uploads results. For better testing efficiency, in some playbooks, we can call internal Ansible modules instead of role to skip redundant tasks, we can also group Ansible modules into blocks for more targeted unit testing. Furthermore, there are helper scripts to get coverage from integration tests via Ansible, basic unit for argument parsing, additional helper files for assertion/test setup/logging.
Code structure
The repository is structured as follows:
./defaults/– Contains the default role configuration../examples/– Contains YAML examples for different configurations../library/network_connections.py– Contains the internal Ansible module, which is the main script. It controls the communication between the role and Ansible, imports the YAML configuration and applies the changes to the provider (i.e. NetworkManager, initscripts)../meta/– Metadata of the project../module_utils/network_lsr/– Contains other files that are useful for the network role (e.g. the YAML argument validator)./tasks/– Declaration of the different tasks that the role is going to execute../tests/playbooks/– Contains the complete tests for the role../tests/tests_*.ymlare shims to run tests once for every provider../tests/tasks/contains task snippets that are used in multiple tests to avoid having the same code repeated multiple times.- Each file matching
tests_*.ymlis a test playbook which is run by the CI system.
How to run test
Tox Unit Tests
-
tox -l, list all the unit testing, available unit testing options are:- black
- pylint
- flake8
- yamllint
- py26
- py27
- py36
- py37
- py38
- collection
- custom
- tox, run all the tests
- tox -e py36,
py36is pyunit testing with Python 3.6 - tox -e yamllint, Check the YAML files are correctly formatted
- tox -e black, Check the formatting of the code with Python Black
- …
Integration Test
- Download CentOS 6, CentOS 7, CentOS 8, Fedora images from
- https://cloud.centos.org/centos/6/images/CentOS-6-x86_64-GenericCloud-1907.qcow2c
- https://cloud.centos.org/centos/7/images/CentOS-7-x86_64-GenericCloud-2003.qcow2c
- https://cloud.centos.org/centos/8/x86_64/images/CentOS-8-GenericCloud-8.1.1911-20200113.3.x86_64.qcow2
- https://kojipkgs.fedoraproject.org/compose/cloud/
- Install “standard-test-roles-inventory-qemu” package
dnf install standard-test-roles-inventory-qemu - [TEST_DEBUG=1] TEST_SUBJECTS=
ansible-playbook -v[v] -i <inventory file/script> <tests_….yml> TEST_SUBJECTS=CentOS-8-GenericCloud-8.1.1911-20200113.3.x86_64.qcow2 ansible-playbook -v -i /usr/share/ansible/inventory/standard-inventory-qcow2 tests/tests_default.yml
Overview
Network role enables users to configure the network on the target machine. This role can be used to configure:
- Ethernet interfaces
- Bridge interfaces
- Bonded interfaces
- VLAN interfaces
- MacVLAN interfaces
- Infiniband interfaces
- Wireless (WiFi) interfaces
- IP configuration
- 802.1x authentication
Examples of Connections
The network role updates or creates all connection profiles on the target system as specified in the network_connections variable, which is a list of dictionaries that include specific options.
Configuring Ethernet:
network_connections:
  - name: eth0
    #persistent_state: present  # default
    type: ethernet
    autoconnect: yes
    mac: 00:00:5e:00:53:5d
    ip:
      dhcp4: yes
Configuring Bridge:
network_connections:
  - name: internal-br0
    interface_name: br0
    type: bridge
    ip:
      dhcp4: no
      auto6: no
Configuring Bonded Interface:
network_connections:
  - name: br0-bond0
    type: bond
    interface_name: bond0
    controller: internal-br0
    port_type: bridge

  - name: br0-bond0-eth1
    type: ethernet
    interface_name: eth1
    controller: br0-bond0
    port_type: bond
Configuring VLANs:
network_connections:
  - name: eth1-profile
    autoconnet: no
    type: ethernet
    interface_name: eth1
    ip:
      dhcp4: no
      auto6: no

  - name: eth1.6
    autoconnect: no
    type: vlan
    parent: eth1-profile
    vlan:
      id: 6
    ip:
      address:
        - 192.0.2.5/24
      auto6: no
Configuring Infiniband:
network_connections:
  - name: ib0
    type: infiniband
    interface_name: ib0

  # Create a simple infiniband profile
  - name: ib0-10
    interface_name: ib0.000a
    type: infiniband
    autoconnect: yes
    infiniband_p_key: 10
    parent: ib0
    state: up
    ip:
      dhcp4: no
      auto6: no
      address:
        - 198.51.100.133/30
Configuring MACVLAN:
network_connections:
  - name: eth0-profile
    type: ethernet
    interface_name: eth0
    ip:
      address:
        - 192.168.0.1/24

  - name: veth0
    type: macvlan
    parent: eth0-profile
    macvlan:
      mode: bridge
      promiscuous: yes
      tap: no
    ip:
      address:
        - 192.168.1.1/24
Configuring a wireless connection:
network_connections:
  - name: wlan0
    type: wireless
    interface_name: wlan0
    wireless:
      ssid: "My WPA2-PSK Network"
      key_mgmt: "wpa-psk"
      # recommend vault encrypting the wireless password
      # see https://docs.ansible.com/ansible/latest/user_guide/vault.html
      password: "p@55w0rD"
Setting the IP configuration:
network_connections:
  - name: eth0
    type: ethernet
    ip:
      route_metric4: 100
      dhcp4: no
      #dhcp4_send_hostname: no
      gateway4: 192.0.2.1

      dns:
        - 192.0.2.2
        - 198.51.100.5
      dns_search:
        - example.com
        - subdomain.example.com

      route_metric6: -1
      auto6: no
      gateway6: 2001:db8::1

      address:
        - 192.0.2.3/24
        - 198.51.100.3/26
        - 2001:db8::80/7

      route:
        - network: 198.51.100.128
          prefix: 26
          gateway: 198.51.100.1
          metric: 2
        - network: 198.51.100.64
          prefix: 26
          gateway: 198.51.100.6
          metric: 4
      route_append_only: no
      rule_append_only: yes
Configuring 802.1x:
network_connections:
  - name: eth0
    type: ethernet
    ieee802_1x:
      identity: myhost
      eap: tls
      private_key: /etc/pki/tls/client.key
      # recommend vault encrypting the private key password
      # see https://docs.ansible.com/ansible/latest/user_guide/vault.html
      private_key_password: "p@55w0rD"
      client_cert: /etc/pki/tls/client.pem
      ca_cert: /etc/pki/tls/cacert.pem
      domain_suffix_match: example.com
Reference
- The external landing page for the system roles project, https://linux-system-roles.github.io/
- The external network role docs, https://github.com/linux-system-roles/network/
Separate INFO and DEBUG logs
Introduction
Before refactoring logging of network module, the module collects all logging statements, and at the end returns them as “warnings”, so that they are shown by ansible. Obviously, these are not really warnings, but rather debug information..
How to reproduce
We can reproduce this network module bug by doing qemu test.
TEST_SUBJECTS=CentOS-8-GenericCloud-8.1.1911-20200113.3.x86_64.qcow2 ansible-playbook -vv -i /usr/share/ansible/inventory/standard-inventory-qcow2 ./tests/playbooks/tests_ethernet.yml

How to resolve it
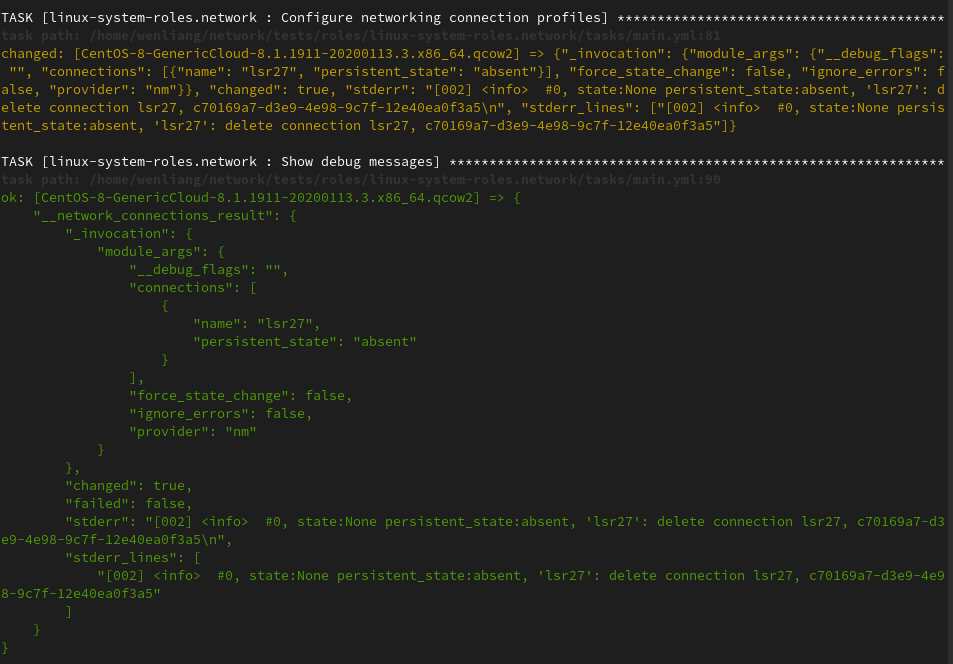
The logging messages should be returned in a different json field that is ignored by ansible. Then, the tasks/main.yml should have a follow-up debug task that prints the returned variable. In the failure case, the network_connections task must run ignoring failures to reach the debug statement. Then, a follow up task should check whether the network_connections task failed and abort.
What is the result
After bug fixed, we can also use the same qemu test to compare the result:
Additional test cases
Beyond that, we also have some assertion to confirm that we indeed separate Info and Debug logs.
In ./tests/tests_default.yml, we have the following testing code to assert no warning
in _network_connections_result.
---
- name: Test executing the role with default parameters
  hosts: all
  roles:
    - linux-system-roles.network
  tasks:
    - name: Test warning and info logs
      assert:
        that:
          - "'warnings' not in __network_connections_result"
        msg: "There are warnings"
In ./tests/tasks/assert_output_in_stderr_without_warnings.yml, we assert no warning in
_network_connections_result, and assert stderr in _network_connections_result.
---
- name: "Assert that warnings is empty"
  assert:
    that:
      - "'warnings' not in __network_connections_result"
    msg: "There are unexpected warnings"
- name: "Assert that there is output in stderr"
  assert:
    that:
      - "'stderr' in __network_connections_result"
    msg: "There are no messages in stderr"
The following Ansible logs is extracted from same qemu testing result after the bug fixed:

Demo video
I made a demo video to show the bugs and refactoring logging of network module after bug fixed, as well as additional test cases running result.
Reference
- Refactor logging of network module, https://github.com/linux-system-roles/network/issues/29
- Separate debug and info logs from warnings, https://github.com/linux-system-roles/network/pull/207